How to Use the MyFitLife Meal Planner: Build, Shop, and Log Your Week
A screen-by-screen guide to building meals in MyFitLife, adjusting a weekly plan, previewing groceries, and logging what you actually eat.
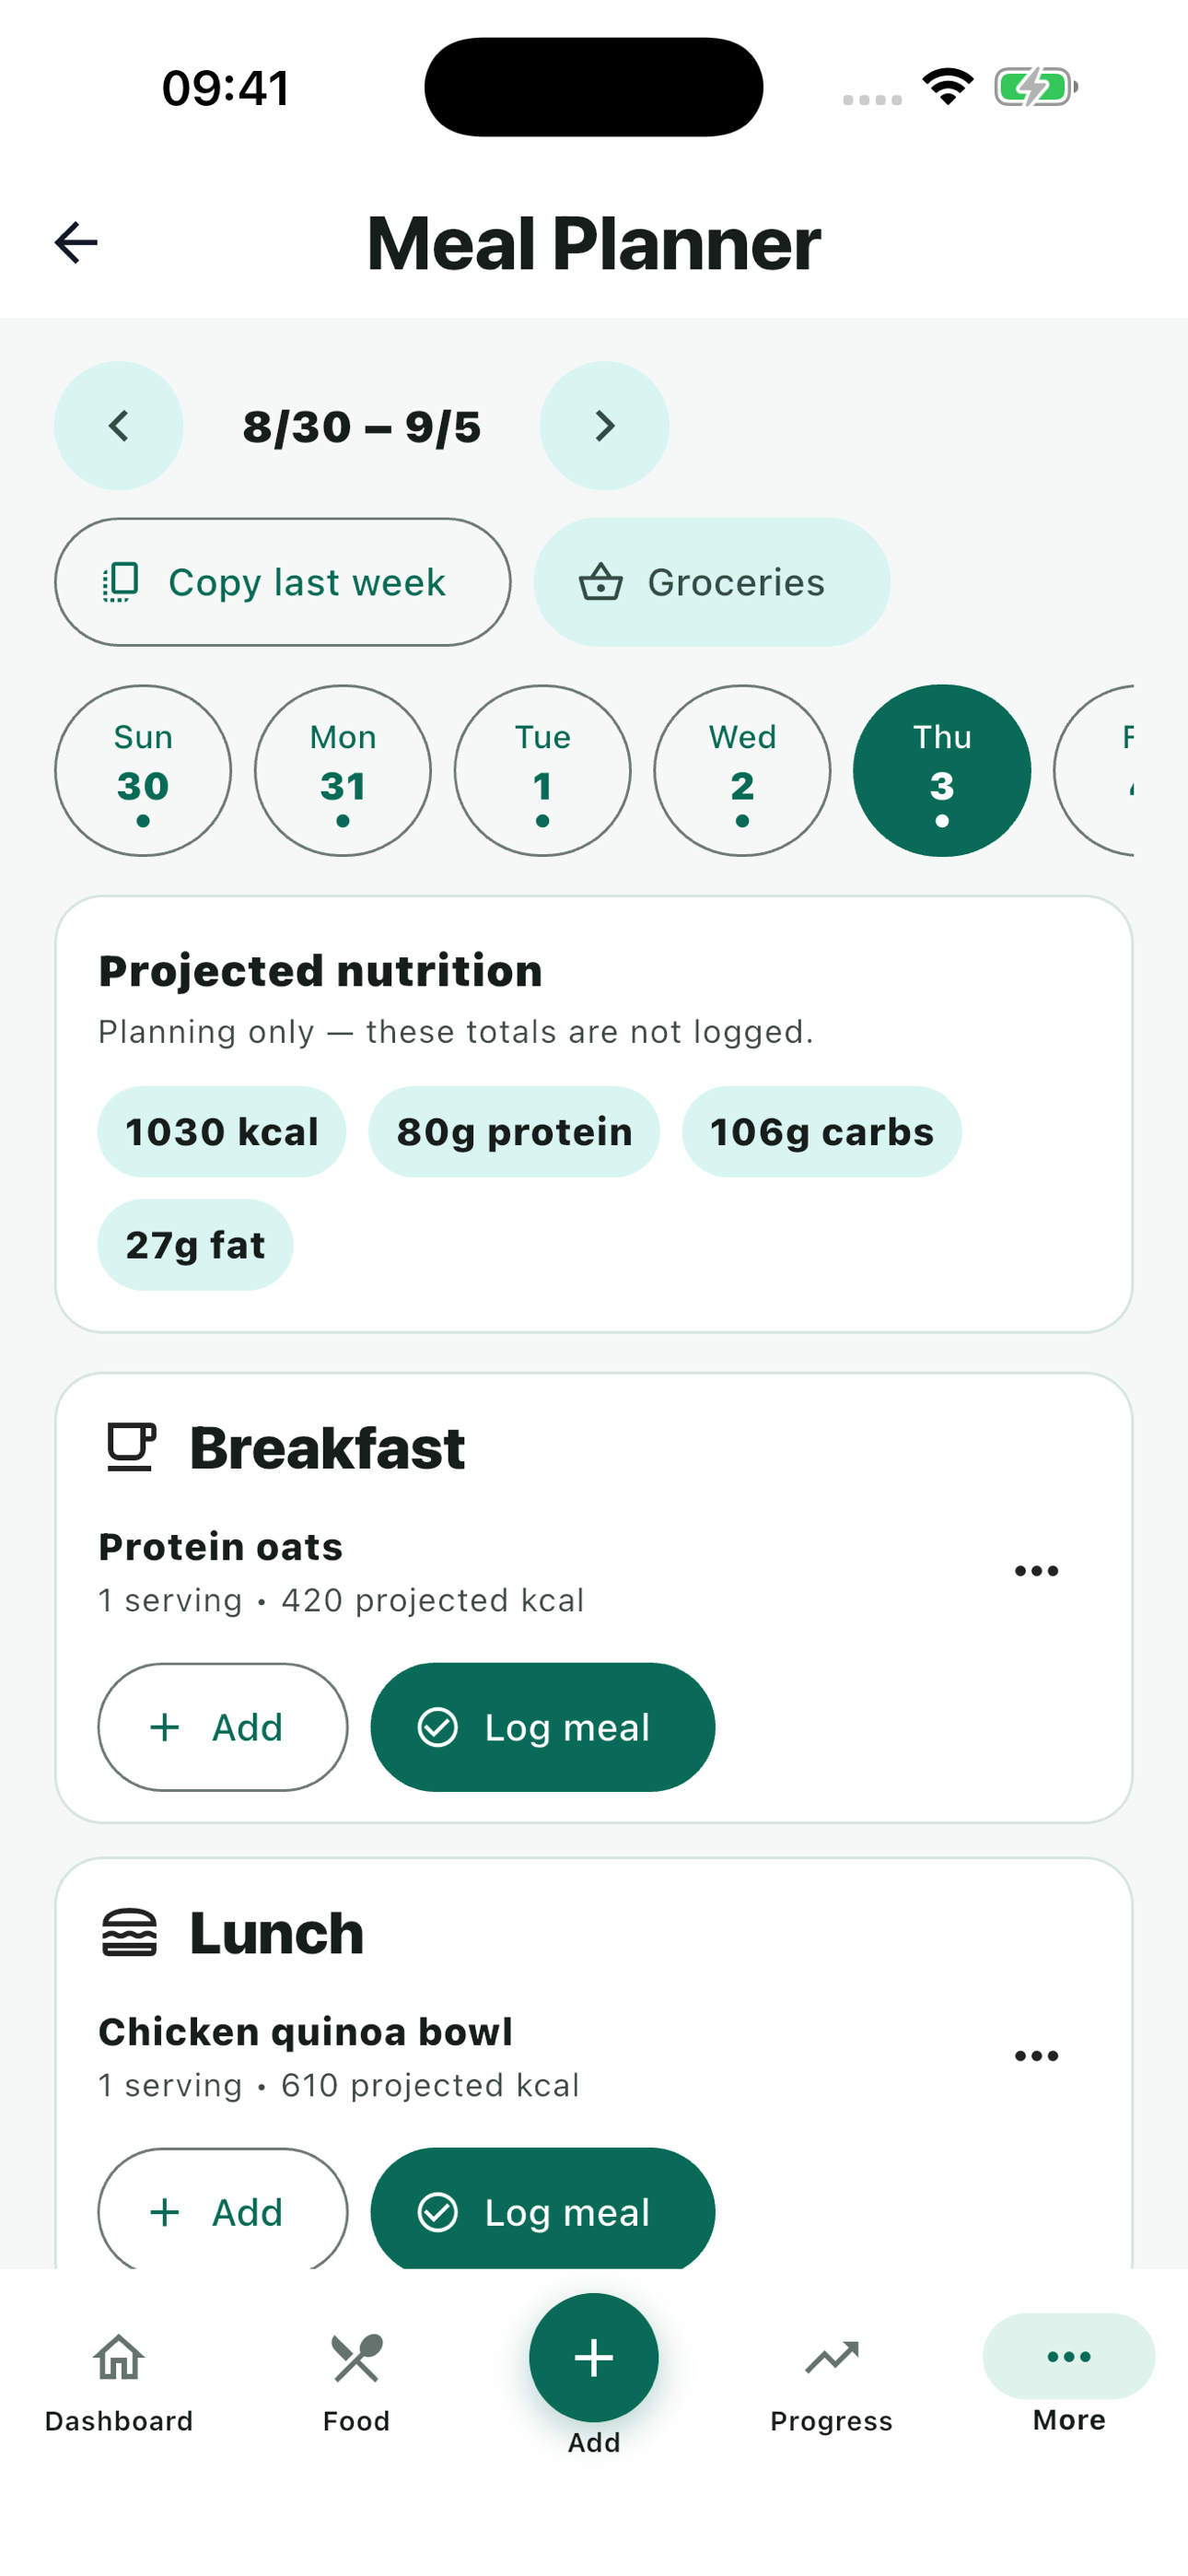
Want to put Tuesday's dinner on the calendar without telling your food log that you already ate it? Open MyFitLife's Meal Planner. This walkthrough follows the mobile screen from the first tap through a reviewed grocery list and a logged meal. You can use the weekly planner on the Free tier. The central habit is simple: build and edit a plan before the meal; use Log meal after you eat it.
You do not need seven perfect days before the planner becomes useful. One dinner with two components is enough to learn the controls. The example below starts with a saved recipe and a separate side, then fills a modest week around meals you actually expect to make. Values shown by your app depend on the foods, recipe details, and servings in your own account.
1. Open Meal Planner and choose the right week
From More, open Food Library and tap Meal Planner. You can also reach it from the Dashboard's Today's plan card or from the Food screen. At the top of Meal Planner, the left and right arrows change the displayed week. Each week runs Sunday through Saturday; the row of day buttons beneath the date range lets you choose a day. A dot marks a day with planned items. If you navigate to another week, check the date range before adding anything.
After choosing a day, look at its five meal cards: Breakfast, Lunch, Dinner, Snack, and Drinks. Each starts with Nothing planned until you add an item. Above the cards, Projected nutrition shows the selected day's planned calories, protein, carbohydrates, and fat. The label says Planning only — these totals are not logged. Treat that card as a view of the plan, including items in a slot you may already have logged, rather than a count of what remains to eat.
2. Build a meal from the foods you know
Select the day, find the meal card, and tap Add. The Build sheet opens with five tabs. Search looks up a food; type at least two characters and run the search. Recent shows foods you have logged recently. Saved shows foods you saved for reuse. Recipes lists recipes already in your account. Manual lets you enter a food name and estimated calories, protein, carbohydrates, and fat when another source is unsuitable. These are different ways to choose an item for the same meal draft, so you can mix them.
- For a Monday dinner, tap Add in Dinner and open Recipes. Tap Add beside a recipe you previously saved. If Recipes is empty, save a recipe first or start with Search, Saved, or Manual.
- Use the serving dialog to set how much of that recipe you plan to eat, then tap Use servings. The chosen recipe appears in Meal draft at the bottom of the sheet.
- Open Saved or Search and add a separate side. Set its servings too. The two choices now appear together in the draft; the draft count shows how many items will be built.
- Inspect each item's name and serving. Use Edit servings or Remove in the draft if something is wrong. Read the draft's projected calories and macros, then tap Build this meal (2).
Choosing an item stages it in the draft. Build this meal is the confirmation that places the group in the selected meal card. The screen allows up to 20 items in a slot; when it is full, Add changes to Meal full. The serving step uses half-serving increments from 0.5 to 12 in the mobile interface. Check the serving basis on the food or recipe itself: changing a multiplier makes the projection larger or smaller, but cannot fix an incorrect underlying entry.
For a simple arithmetic check, suppose a reviewed entry is 420 calories and 30 grams of protein per serving. Selecting 1.5 servings projects 630 calories and 45 grams of protein for that item. Those numbers are illustrative, not measured values for your recipe. FDA guidance explains that a label serving size is a reference amount, not a recommendation for how much you should eat. Confirm the entry’s serving basis before applying the multiplier, especially when a label uses grams and your recipe uses portions.
A recipe must be saved before it appears in the planner's Recipes tab. When a recipe draft offers Save & Plan, that action saves the recipe and opens a placement sheet where you choose its date, meal, and servings. Saved foods and saved recipes can also offer Plan from their own library actions. Those entry points are useful when you are browsing your food library; the Add flow inside Meal Planner is better when you want to assemble several items into one meal.
3. Check the day, then move or resize anything that changed
Back on Meal Planner, your Monday dinner card lists the items you confirmed and their projected calories. The day card above reflects the planned total across that day's slots. Tap the three-dot Actions control beside an item for Edit servings, Move, or Remove. Edit servings updates that item's projection. Move opens a sheet for a different day or meal within the displayed week and also lets you adjust servings. Remove takes that planned item out of the slot. None of these planning edits records food as eaten.
Try a specific review: if dinner shifts from Monday to Tuesday, use Move on the planned item and select Tuesday's Dinner. If a second item was meant to travel with it, move that item as well; Move works on one row at a time. Return to both days and verify the cards, since the projected totals change with placement. Once a slot has been logged, it shows Logged and its planned rows can no longer be edited in this screen.
A practical first week you can adapt
Start with meals whose ingredients and timing are predictable. This illustrative schedule is a set of planning prompts, not a prescribed menu or nutrient target. Use the foods you have actually saved, check your own recipe details, and leave uncertain meals unplanned until you know what you will eat.
| Day | Meal to place | Source to try | Review before confirming |
|---|---|---|---|
| Sunday | A familiar dinner | Recipes | Recipe servings and ingredient list |
| Monday | Repeat breakfast and dinner with a side | Saved plus Recipes | Each item's serving and the dinner draft total |
| Tuesday | Lunch that travels well | Recent or Saved | Whether the selected entry matches the portion packed |
| Wednesday | A flexible dinner | Search or Manual | Food identity and any estimate entered manually |
| Thursday | Repeat a reliable lunch | Saved | Whether this week needs the same serving as last time |
| Friday | One planned meal, rest flexible | Recipes or Recent | Schedule changes before buying ingredients |
| Saturday | Use what is available | Leave open or add later | What remains in the kitchen before shopping again |
The useful pattern is to plan enough to prepare, not to turn every blank card into a task. You can return at any time, choose another day, and build another meal. The empty cards make uncertainty visible. They do not mean you failed to complete the week.
4. Copy a familiar week carefully
Once a previous week has a plan worth reusing, navigate to a new, empty week and tap Copy last week. The dialog asks Copy last week? and offers Copy week. Confirm only after checking the destination date range. MyFitLife places the prior week's slots on corresponding days of the displayed week. The copied meals begin as planned, even if their earlier versions had been logged.
Copying is for an empty target week. If that week already has planned items, the app reports a conflict instead of combining plans or replacing your work. Review the copied week day by day: this week's portions, schedule, recipe choices, and groceries may differ. You can use Edit servings, Move, and Remove to turn last week's structure into a realistic new plan.
5. Preview groceries before adding anything
Tap Groceries at the top of Meal Planner. The Grocery preview dialog lists ingredient entries available from the week's planned items and states that nothing is added until you confirm the exact preview. Read every line, then tap Add exactly N if it is the list you want. If the dialog says No recipe ingredients are available to add, close it and check whether the planned items have ingredient lists. A manually entered food name alone does not supply a recipe's ingredients.
Open Pantry and switch to Grocery to review the resulting Grocery List. Pantry is the app area that contains Recipes, Grocery, and Saved; the planner does not know how much rice or produce is in your kitchen. Compare the list with what you own before shopping. The preview removes repeated ingredient text that matches after case and whitespace cleanup, but it does not add quantities, convert units, work out package sizes, or subtract supplies already on hand. For example, 1 cup spinach and 1 CUP spinach may appear once; 1 cup spinach and 200 grams spinach remain separate entries. Adjust the shopping list for your real needs.
If you edit the plan after opening a grocery preview, the confirmed export may report that the preview changed. Run Groceries again and inspect the refreshed list. That protects you from adding a list different from the one you just reviewed. The current Meal Planner button previews the displayed week's eligible ingredient entries as a group; it does not offer a per-slot selector on that screen.
What each button changes
Keep this reference handy when a planned meal, a shopping item, and a consumed meal seem to be the same thing. They represent different actions in the app.
| Action | Meal plan | Consumed food log | Grocery list |
|---|---|---|---|
| Add, Build this meal, Edit servings, Move, Remove | Changes planned items and projected values | No change | No change |
| Copy last week | Fills an empty target week with planned slots | No change | No change |
| Groceries preview | No change | No change | No change |
| Add exactly N | No change | No change | Adds the reviewed ingredient entries |
| Log meal | Marks the eligible slot Logged and locks its planned rows | Adds that slot's items as consumed | No change |
6. Log the meal after you eat it
When the meal is today or in the past, return to its card and tap Log meal. A future card instead says Log on this day and cannot yet be logged. Logging takes the items in that whole slot into the consumed food record and marks the slot Logged. If an active fast is in progress, follow the app's prompt about ending it or keeping it active where allowed. Check the card before logging: once logged, its plan rows become read-only.
If you ate something different, make the plan match reality before using Log meal, or record the food you actually ate through the normal Food log instead. A plan is preparation, not proof of consumption. Look at your logged day when you want the consumed totals; the planner's Projected nutrition card continues to describe its stored plan, including slots already marked Logged. Do not subtract the two cards as though the projected value were a remaining allowance.
Troubleshooting the common stops
- Recent, Saved, or Recipes is empty: those tabs use food or recipes already in your account. Search or Manual can start a draft now; save useful foods or recipes for future weeks.
- Search returns no matches: try a shorter food name, check the spelling, or use Manual with values you can verify. Search needs at least two characters and depends on the food-search service being available.
- Build this meal does not complete: read the message in the draft. If the app says it cannot confirm whether the meal saved, close the draft and use its Retry or Abandon recovery on Meal Planner rather than immediately making a new copy.
- Copy last week fails: confirm that the preceding week has a plan and the displayed target week is empty. A partly built target week is not overwritten.
- Grocery preview is empty: only items with ingredient entries can contribute. Check saved recipes and their ingredients; foods without an ingredient list will not create a complete shopping list.
- Log meal is unavailable: the date may still be in the future, the slot may be empty, or the meal may already show Logged. Return on the meal's day and check the card before recording it.
The planner is available with MyFitLife Free; you do not need Premium just to build a week, copy it, preview groceries, or log planned meals. Using an AI recipe tool is a separate choice, not a required step in this workflow. Nutrition projections depend on source information and entered portions, and MyFitLife cannot establish allergy safety or a personal medical target from a plan. Use the Privacy Statement and Health Disclaimer for those wider boundaries.
For the reasoning behind projected versus consumed nutrition and the safeguards around building, copying, and exporting, read Can You Plan Weekly Meals Before Logging Them? For a closer look at reconciling recipe ingredients into a shopping list, read How to Build a Grocery List From Your Meal Plan. This tutorial is your tap-by-tap route through the mobile Meal Planner: choose the week, build a meal, adjust it, inspect groceries, and record what happened after you eat.
Sources and further reading
- Serving Size on the Nutrition Facts Label U.S. Food and Drug Administration
- MyFitLife Premium MyFitLife
- MyFitLife Privacy Statement MyFitLife
- MyFitLife Health Disclaimer MyFitLife
Related articles
- Can You Plan Weekly Meals Before Logging Them?
- Meal Planning With a Grocery List: A Simple Weekly System
- Can a Grocery List Automatically Sort Recipe Ingredients by Store Aisle?
Install free. Keep the core tracker free.
Log food, scan barcodes, track macros, and review progress without starting a subscription.